
Sections on this Page
Topics on this page concerning snowmobile club photo sharing on SmugMug:
- Introduction to SmugMug
- Two Important SmugMug LInks
- Viewing Modes
- Subscribe with RSS
- Share with Comments and Links
- Photos with Location GPS
- Upload Method for Smart Phones
Introduction to SmugMug
We encourage all Shrewsbury Sno-Birds Snowmobile Club members to share your riding experiences with your club by uploading your photos taken out on the trails to our SmugMug photo site. If you are not already familiar with SmugMug please browse around and get to know what we believe to be the finest photo sharing site on the web. SmugMug serves up our photos in all of their glory and allows others in the club to comment. Try out the slide show found on any of our gallery pages as a right pointing triangle. In true blog fashion, SmugMug allows you to subscribe with RSS feeds so you will be notified when new photos have been added. Need a feed reader? This link provides some possible readers though Internet Explorer and FireFox both have feed readers.
^ scroll up to page section list ^
Two Important SmugMug Links
Our SmugMug Homepage Link
Use this link to go to our SmugMug Homepage. It is the same as the one found in our main menu bar.Photo Upload Link
This link is the same uploader link found on our SmugMug home page as well as in the sidebar of our website. Read more about using the uploader window that the link opens below.Drag and Drop Method
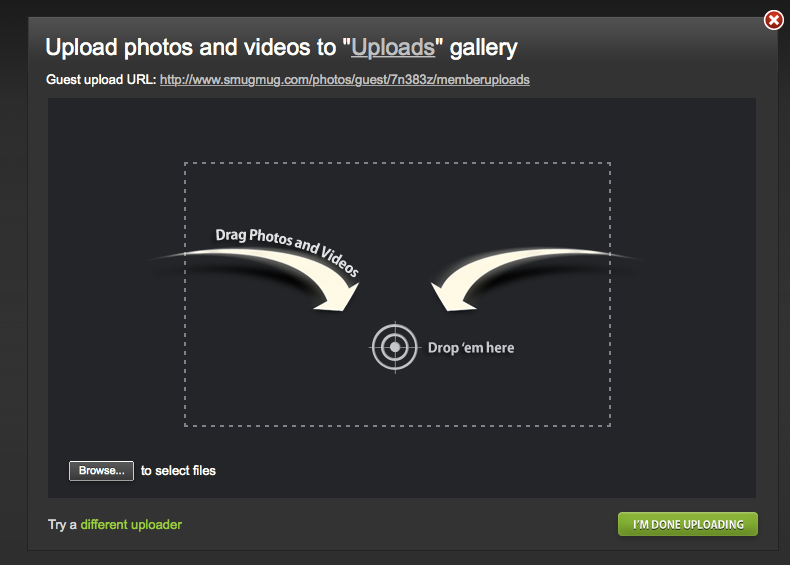 The uploader offers Drag and Drop which is super easy once you arrange your screen so that both the uploader window and a window of your photos are visible on your computer screen. Try arranging the two windows side by side. With both uploader and pictures window visible, you select some photos, using shift click to select consecutive photos or for nonconsecutive photos use control click (Windows) or command click (Mac). With your chosen photos selected, click and hold one (mouse down) and drag it to the upload window by moving your mouse. The rest follow along too. If there are more you want to upload, don’t worry, you can drag and drop multiple times to the uploader. This mild mannered upload window is so simple looking yet it is smart enough to ask you if you really want to upload duplicates. Please, just say no to duplicates! It might even scold you for trying to upload some incompatible file but it’s OK, you are not graded on this! Fun and easy once you get the hang of it, right?
The Browse Method
![]() The upload window offers another method to upload with the innocuous Browse… button hiding in the lower left of the uploader. Clicking it reveals a familiar dialog box asking you to choose photos on your computer. This method requires you to know where on your computer your photos live. Most commonly Windows users will find them in your Pictures folder wile Mac users have a handy Photos link in the sidebar of any dialog box.
The upload window offers another method to upload with the innocuous Browse… button hiding in the lower left of the uploader. Clicking it reveals a familiar dialog box asking you to choose photos on your computer. This method requires you to know where on your computer your photos live. Most commonly Windows users will find them in your Pictures folder wile Mac users have a handy Photos link in the sidebar of any dialog box.
Photo Size
Since small photos will not provide full screen slide shows, choose a large size to upload. If you are using a camera phone or compact digital camera, your photo size if probably perfect to use as they are right from the camera. Please don’t reduce their size! On the other hand professional cameras can produce huge photo sizes so upload times may be too long for uploading images the size they come from the camera. Professional camera users have to deal with this size issue all the time so I’ll just recommend, if you must reduce photo size, consider using maximum dimensions near 2000 pixels wide by 1300 pixels high. This should allow for a nice big slide show for everyone and keep your upload times very reasonable. If you can choose a jpg quality in your size reduction, 80% or one step less than maximum really cuts the size down but with minimal visible reduction in quality. How do you know what size they are? Try different window views on your computer. There should be a view that shows you information like width and height in pixels. If that doesn’t work for you, select a photo and right click it. In the popup menu choose properties or get info. Around 1 to 2MB is big enough. Bigger is OK too if you don’t mind the time it takes to upload.
Email Us
When you upload photos, it is a good idea to drop us an email so we know to move them to a visible gallery sooner rather than later. If you don’t, we’ll find them eventually and get them moved. Our email link is near the top of any page. If you upload many photos we will create a new gallery for them but we’ll need some information from you like if you want the gallery named with your name or something else. When you find your photos have been moved to a visible gallery, please notice the comment button in the lower left, under the thumbnails. Click it and fill in your email address and choose comment on photo. Type in a caption including things like place, date, trail conditions and add your name or remain anonymous. Next time we see your photo we will copy your caption into the caption area under the photo.
^ scroll up to page section list ^
Viewing Modes
Lightbox
There is so much more than viewing the photos by the default gallery. Click the image and it takes center stage as large as window and photo size allow. This is called Lightbox mode and you can scroll through the whole gallery in this mode with forward and back buttons at right and left. Clicking the “X” takes you back to the gallery. The “i” button will give photo information if there is any including location.
Slideshow
The most spectacular mode, Slideshow, completely fills your screen providing the uploaded photo is large enough. From Lightbox mode, look for the right pointing arrow, “play” button. Again there is an “X” to get out of Slideshow mode or you can hit the Escape key. If you have a high-resolution and/or large screen, you’ll notice some photos do not fill the screen. This is because they were not uploaded at full size or the camera was set at lower resolution. See the Photo Sizes section above for more on sizes.
^ scroll up to page section list ^
Subscribe with RSS
Those familiar ![]() (RSS feed icons) at the bottom of gallery pages allow you to subscribe to any gallery. Then you will be notified of when new photos are added to that gallery.
(RSS feed icons) at the bottom of gallery pages allow you to subscribe to any gallery. Then you will be notified of when new photos are added to that gallery.
Share with Comments and Links
Share
![]() At the lower left of any gallery page is a comments button. It gives you a choice to comment on the whole gallery or just on the current photo. You can write more comments describing your pictures and your experiences beyond the caption in as much detail as you’d like. Have a question about someone else’s photo? Post it in a comment under their photo or answer someone else’s question in the comments whether it is your photo or not. Also use the Share Button at the bottom of every photo in Lightbox with choices every way imaginable. The most versatile is the Get a Link option where you can get links for various sizes of the photo, links for the gallery in various formats and more.
At the lower left of any gallery page is a comments button. It gives you a choice to comment on the whole gallery or just on the current photo. You can write more comments describing your pictures and your experiences beyond the caption in as much detail as you’d like. Have a question about someone else’s photo? Post it in a comment under their photo or answer someone else’s question in the comments whether it is your photo or not. Also use the Share Button at the bottom of every photo in Lightbox with choices every way imaginable. The most versatile is the Get a Link option where you can get links for various sizes of the photo, links for the gallery in various formats and more.
^ scroll up to page section list ^
Photos with Location GPS
layers button
Photos taken with a GPS savvy camera have location coordinates embedded in them. Once one SmugMug these photos appear on a map showing where they were taken. There are some GPS photos on our SmugMug site and you can see them all with the SmugMap on the bottom of our SmugMug homepage.
It shows the points on the map where photos were taken and allows zooming in and out. Click the layers icon in the upper right of the map to convert the SmugMap to a SmugArial view which reveals additional details like Killington and Pico Ski Areas. If you are shooting with a GPS enabled smart phone, be sure to activate location services and allow them to be used by the phone’s camera so your photos will be tagged with GPS information. Then when you upload images to SmugMug, they will join the other GPS tagged photos on the SmugMap.
^ scroll up to page section list ^
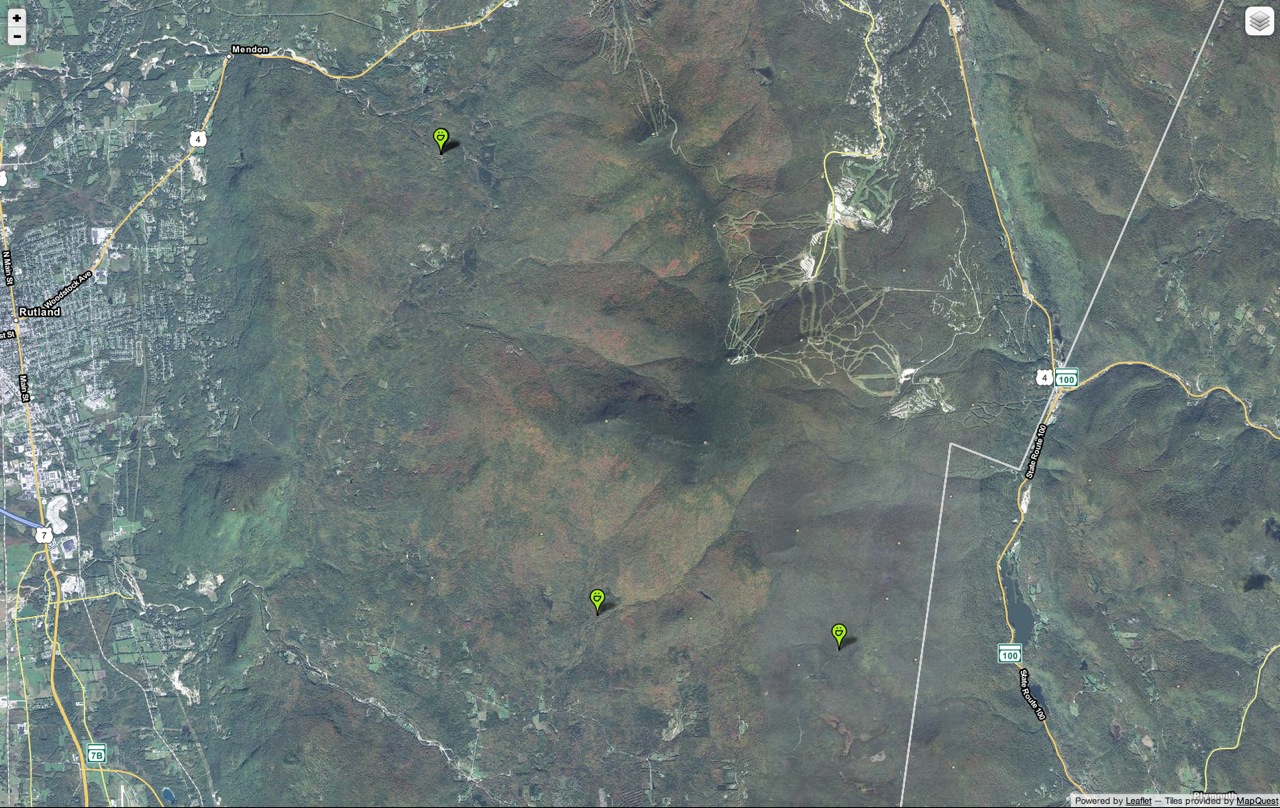
Sample SmugMap
Upload Method for Smart Phones
- The recommended method is to use the photo uploader link with your smart phone which is on both the desktop website and the mobile website. A great advantage is that it allows you to upload multiple images. Click the “Browse…” button or “ADD PHOTOS” and you will have accesses to all your albums including your camera roll and photo stream where you can select as many photos as you want. Tap “Done” and they will all upload. Easy! See this blog post I wrote to help mobile users upload.
- An alternate way to upload photos to SmugMug is via email. Either choose to share a photo via email or attach the desired photo to an email message. You must address the email to our special upload email address: shrewsburysnobirds (at) email (dot) smugmug (dot) com (formatted as an email address with no spaces or parentheses). We suggest you add this to your address book so you only have to type it once! In the subject line you must enter the password: 36miles which comes from the number of miles in the Sno-Birds trail system. That is all you need but as an option, you may enter text in the body of the message that will become a photo caption. Emailed photos collect in an invisible gallery and wait until a moderator finds them and moves them to a visible gallery.
^ scroll up to page section list ^